
You are currently browsing the tag archive for the ‘spring’ tag.
Pardon my long absence here. Well shoot! There has been a lot going on. Since I have been away I am grateful to read all of your comments and emails. I loved this little post about my last recipe for the peanut butter tarts! Thank you Baking Bird.
Seasonally, who doesn’t love spring?
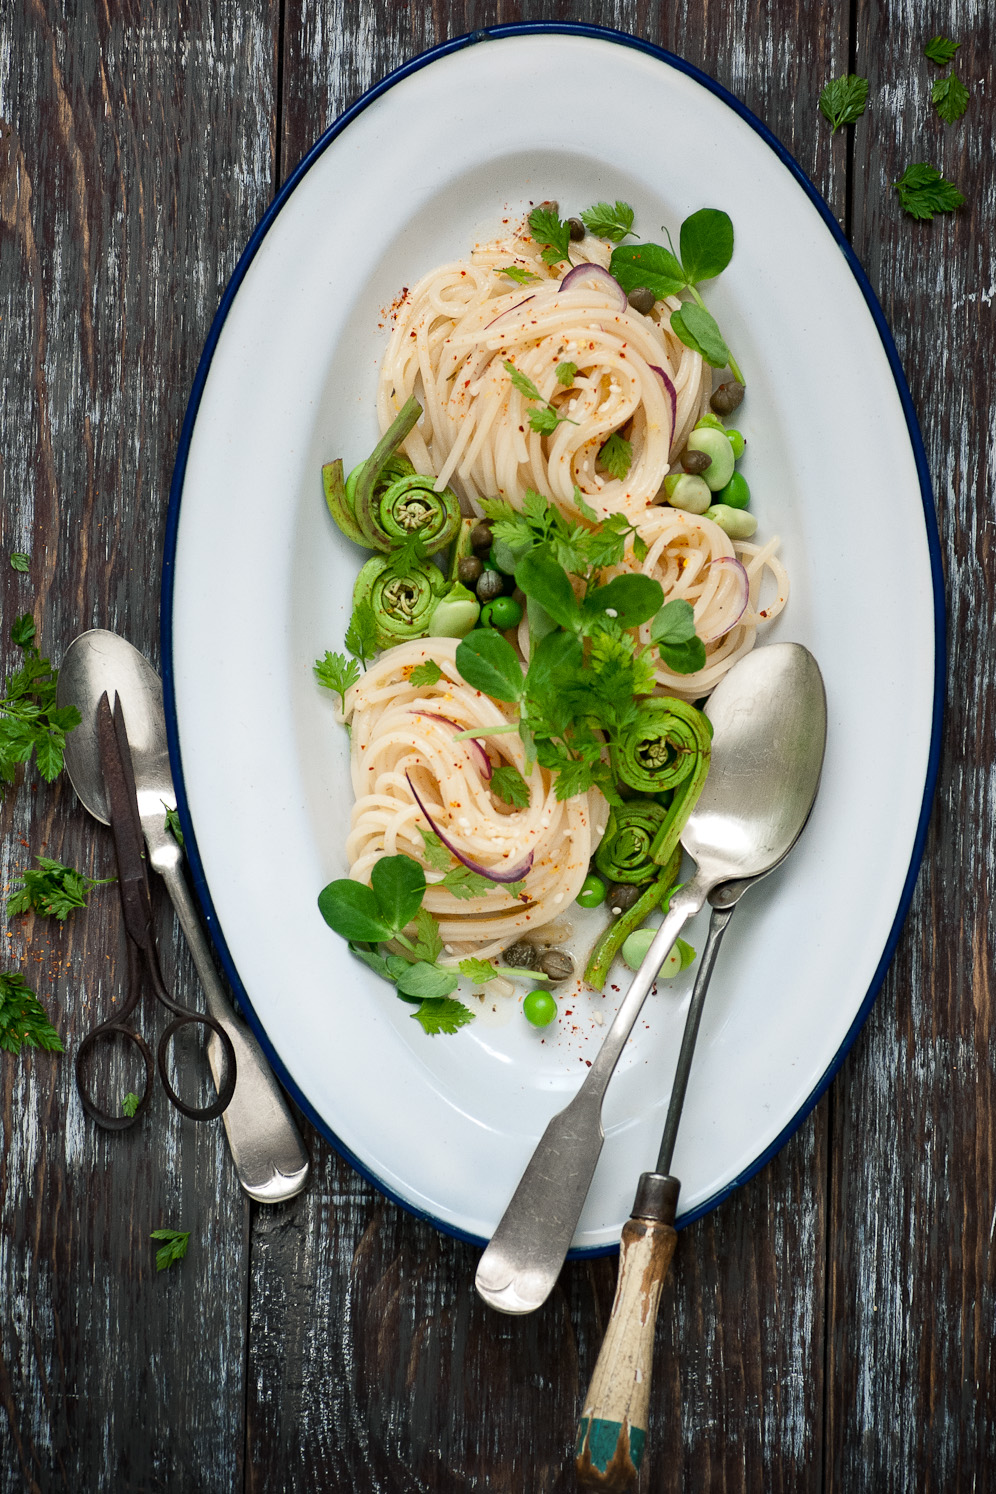
I dig spring; it’s all about the sweet peas, the mesmerizing shapes of the fiddleheads and aroma of spring onions. I could not imagine a spring pasta dish without peas, tender greens and fiddleheads. Could you?
For this Northerner, I welcome it as soon as fall heads into winter, and looking forward to the first blooms of the season.
Springtime is where the sweeping away of the robust flavors of winter and the attentive nature of the palette gears towards fresh, vibrant things.

All of these and more are delicate in substance needing nothing more than a brisk dive in frantically boiling water and to set their emerald color.
For a few weeks it will be the enjoyment of what spring has to offer. The most vibrantly emerald green soups, tender asparagus, and the most beautiful blossoms.

Until then, have a beautiful spring.
Spring Pasta Recipe [Serves 4]
4 ounces gluten-free spaghetti pasta
3 cups fresh pea shoots –or- baby arugula
1 cups fiddlehead ferns
½ cup freshly shelled peas
½ cup freshly shelled fava beans
¼ cup thinly sliced purple spring onion
¼ cup capers, drained
Meyer Lemon Vinaigrette
White sesame seeds [for garnishing]
Fresh chervil leaves [for garnishing]
Ground red pepper [for garnishing]
Shaved Parmesan [optional, not pictured]
1. Cook pasta as directed on the package, rinse to cool.
2. Briefly blanch peas, fava beans and fiddleheads in salted water, cool in ice water.
3. Toss pasta with vinaigrette, blanched vegetables and capers.
4. Place half of the pea shoots on a platter.
4. Place dressed pasta on a serving platter and garnish with Parmesan shavings, remaining pea shoots, chervil, sesame seeds and ground red pepper.
Meyer Lemon Vinaigrette [for recipe above]
3 Tablespoons toasted hazelnut oil
2 Tablespoons fresh Meyer lemon juice
1 – 1 ½ teaspoon Meyer lemon zest
1 ½ teaspoon Dijon mustard
1 teaspoon cane sugar
¾ teaspoon sea salt
½ teaspoon dried marjoram
1. Whisk together all ingredients except the oil until smooth.
2. Slowly whisk in oil until emulsified.
There is nothing more dramatic in spring than a tree in full flower.

I posted a sneak peak at some of the trees in bloom and here are some more photos I was happy to capture and share.


So here we are, just enjoying the last fleeting marvels of spring and spending time in the garden. It’s hard to believe that the peonies will be blooming soon. I get a little excited for their arrival and this year the peonies are towering giants.
Today’s recipe is for a strawberry-rhubarb crumble, one that is easily made gluten free and as always delicious to eat. I have a tender love for crumbles as they remind me of spring. Later on when summer fruits are ripe for the picking, there will be more.
The raspberries, blackberries and peaches. All are delicious in such a simple dessert.

When I first made these crumbles they were too irresistible to wait for preparing a blog post. More and more where made. It seemed that every day, another batch was made.
Perfect with ice cream, J’s favorite and gently whipped cream for me. Our dessert of choice for spring has been these crumbles!

I even snuck a few out for others to enjoy; they returned exited for more. And yes, I did get my cute bowls back. I am a little attached.


Hope you are enjoying the spring and getting a chance to see the fleeting abundance of nature!
Strawberry-Rhubarb Crumble [makes 4 servings]
6 Tablespoons cane sugar
2 Tablespoons corn starch
½ vanilla bean, scraped [discard pod or tuck into the sugar canister]
2 Tablespoons Key lime juice [lemon will work here too!]
2 ¼ cups rhubarb, cut into half inch slices
2 cups strawberries, halved
Crumble Topping Recipe
¼ cup millet rice flour
¼ cup amaranth flour
4 Tablespoons cane sugar
4 Tablespoons butter, chilled
3 Tablespoons unsweetened coconut, shredded
2 Tablespoons sliced almonds
¼ teaspoon sea salt
Preheat oven to 375°F.
preparing the crumble:
1. Combine the flours, sugar and sea salt.
2. Cut in butter until a coarse meal forms.
3. Stir in coconut and almonds.
4. Chill the crumble until ready to bake.
preparing the fruit:
1. Stir together cane sugar, corn starch and vanilla seeds.
2. Pour sugar mix over fruit and mix in.
3. Add citrus juice and fold again. Allow fruit to macerate for 5 minutes.
4. Portion fruit and juices in 4 baking dishes and top with crumble.
5. Bake for 35-40 minutes or until juices are bubbling and topping has browned.
*note: If not going gluten free, replace the flours with regular all-purpose flour.
Spring is enchanting and at the same time breathtaking.

It has been a rather busy week. I have made a few desserts in the last week that I will share with you shortly.
In the meantime, enjoy this sneak peak at these amazing blooms we are now seeing everywhere.
Have a great weekend!
Spring… Days are filled with sunny walks, whispering breezes and playing around in the crumbly earth.

A few weeks ago I had mentioned this beet root soup to you and here it is. Soups and other cool weather foods are slowly being replaced with lighter recipes.

Here at home the garden slowly emerges and by some sudden magic is filled with abundance. Alliums are pushing their way towards the sky and blankets of ground covers stretch far and wide. I love spring; everything takes on a new attitude. New vegetables break out into the market stands and appetites are excited to be tantalized by fresh experiences.


Earthy beets, sweet seductive carrots and creamy Japanese sweet potatoes all made it into this wonderful light soup.
And the color, so vibrant!

Continue below for the recipe and have a great weekend.
Beet Root Soup Recipe [Serves 4]
2 Tablespoons coconut oil
1 ½ cup leeks, halved & finely julienne
1 large garlic clove
3 beets, peeled & chopped [approx. 2 cups]
1 Japanese sweet potato, peeled & chopped [approx. 1 cup]
2 medium carrots, peeled & chopped [approx. ½ cup]
1 herb bouquet [2 parsley springs, 2 thyme sprigs, 1 bay leaf wrapped in a leek leaf & tied with twine]
5-6 cups chicken stock -or- vegetable stock
Sea salt & freshly ground black pepper to taste.
1. Sauté leeks in coconut oil on medium to low heat until tender.
2. Add garlic and cook for a few minutes, just to cook out the raw garlic flavor.
3. Add remaining ingredients and bring to a gentle simmer.
4. Cover and continue to cook until everything in tender.
5. Remove herb bouquet and puree soup.
6. Season with salt and pepper and serve with a little touch of cream or crème fraîche.
Already the warm spring weather is getting to me. Peaking outside at the garden from around the corner to see what’s out there, is there anything new to see?

I feel pulled by some mysterious force. Not only to get my hands dirty, but also to capture everything that happens. Even before things begin to bloom I like to envision what will this year look like. Flipping through past spring photos is a chance to see how things looked from the previous year and can be of great help in deciding what needs doing.

There are a few sparse gaps in the garden beds that need some fresh plants, something to merge the fuller areas into one whole planting. I love a densely planted garden space. Weeds are minimal and the tender crumb of the soil stays hydrated, but mostly everything looks lush, content and full of blooms.

Besides looking forward to spring, food is always something I look forward too and being in the kitchen fuels me. Salmon cakes such as these give me a boost when work is full and the “to do” list is long. The early spring chores in the garden are the everyday things that happen, your knees get sore and your back aches, but still my heart is happy knowing that everything will pay off later in the season when the garden can just be enjoyed.
There should be a picnic or two here or a few lazy afternoons there.


It is why I plant and care for this little place knowing that all this care is well worth it and sharing this space with friends is even better. Throw in some nourishing food, some laughter and call it dinner with a view.

For these salmon cakes you can replace the gluten free bread crumbs with Panko breadcrumbs if you are not going gluten free.
Delicious!

Gluten-Free Salmon Cakes [makes 9]
1 pound salmon fillet
1 cup grated zucchini, squeezed of moisture
2 Tablespoons chives, thinly sliced
¼ cup corn meal
1 Tablespoon fresh dill, roughly chopped
1 Tablespoon Lemon Dill Aïoli [from the recipe below]
1 large egg, beaten
½ teaspoon sea salt
¼ teaspoon freshly ground black pepper
¼ teaspoon crushed chilies
½ cup gluten-free bread crumbs
1. Roast salmon with a little olive oil in a 350°F oven for 20-25 minutes or salmon is firm and flakes easily.
2. Cool salmon and flake into large pieces and place in a mixing bowl.
3. Fold in remaining ingredients except bread crumbs with salmon.
4. Using a #20 scoop [approximately ¼ cup], scoop salmon mixture and form into cakes.
5. Coat each side with bread crumbs.
6. In a skillet, heat a little olive oil and cook salmon cakes 2-3 minutes per side over medium heat.
Lemon Dill Aïoli [makes ½ cup]
1 large egg yolk, room temperature
2 teaspoons fresh lemon juice
1 teaspoon Dijon mustard
¼ -½ teaspoon sea salt
½ teaspoon lemon zest
1/3 cup olive oil -or- sunflower oil
1 teaspoon fresh dill, chopped
1. Whisk together egg yolk, lemon juice, mustard, garlic, salt and zest in a bowl.
2. Vigorously whisk in oil in a slow steady stream until emulsified and creamy.
3. Stir in fresh dill.
I hope you had a wonderful weekend. The sunshine and weather was gorgeous the past few days. It’s a marvelous time out in the garden to see everything bursting with life. There is definitely lots of garden chores ahead and getting things ready. The whole process to me is pure joy.

Today spring is finally here. I took a few photos of what I have found already growing quickly in the garden. I hope you enjoy them.

I couldn’t resist the temptation to dig and work in the garden. As you know the weather can take a turn for the worst this time of year. All of the gathered seed pods from last year’s blooms have been scattered about. This usually is the case so that plants I like can pop up everywhere and of course removing the strays that get too close to the more established giants.

I also couldn’t resist sharing some spring like recipes. Bright pink radishes, vibrant sweet peas and seductive purple carrots all favor a splash of fresh colorful flavor.


Can you smell spring in the air? It is glorious!
Dijon Glazed Salmon Recipe [serves 4]
4-8 ounce salmon fillets
2 Tablespoons fresh lime juice
1 Tablespoon strong Dijon mustard
½ Tablespoon olive oil
½ Tablespoon honey
Preheat oven to 350°F.
1. Whisk glaze ingredients in a small bowl and set aside.
2. Pan sear salmon in a little bit of olive oil until sides are golden, approximately 2-3 minutes.
3. Place salmon in an oven safe dish and brush with glaze.
4. Season with salt and freshly cracked pepper.
5. Bake for 15 minutes or until salmon is cooked through.

Sweet Pea & Chickpea Salad [serves 4]
15-ounce can chickpeas, drained & rinsed
1 ½ cups fresh or frozen peas
1 cup purple carrots, fine julienne or grated
2 watermelon radishes, fine julienne or grated
1/3 cup bleu cheese, crumbled [Fourme d’Ambert used here]
¼ cup roasted & salted sunflower seeds
1 large handful of pea shoots [optional]
3 Tablespoons olive oil or sunflower oil
1 Tablespoon fresh lemon juice
1 Tablespoon red wine vinegar
1 Tablespoon strong Dijon mustard
1 Tablespoon fresh oregano
½ teaspoon sea salt
½ teaspoon freshly cracked pepper
1. Assemble the salad ingredients and toss gently in a bowl.
2. Whisk together lemon juice, vinegar, mustard, oregano, sea salt and pepper until smooth.
3. Slowly whisk in oil to emulsify.
4. Toss dressing with salad and serve promptly.

With the weather feeling like late spring last weekend I couldn’t help but make a spring inspired tart and seeing all of those chives in the garden I didn’t hesitate one bit.

Every little bud I see peeking out of lifeless branches or silently emerging out beneath the damp earth always makes me stop to take a peak. The air definitely smells of spring. The buds are plump, the grasses appear like pin cushions and the bulbs have broken ground with force.
We definitely take daily walks through the garden to catch everything that is going on and to see how much the clumps of perennials have spread from last year.

Back in side from the amazing weather there was also a beet root soup cooking away in the kitchen that made it into the late afternoon meal that I must share with you soon. These two items were not intended to be eaten together, but I was hungry for a soup of beets so be on the lookout for this soup.

I am certainly making the beet soup again and a few others this weekend and finding more discoveries of spring outdoors.
Enjoy the sunshine!
Asparagus & Leek Tart Recipe [makes 3-6” Tarts]
¾ cup millet flour
½ cup sweet rice flour
¼ cup tapioca flour
½ teaspoon xanthan gum
½ teaspoon sea salt
8 Tablespoons unsalted butter, chilled
1 large whole egg
2 egg yolks
¾ cup leeks, halved & sliced thin
1 Tablespoons coconut oil
½ bunch asparagus, cut into 1” pieces
4 large eggs
½ cup cream
1 Tablespoons chives, finely sliced
½ teaspoon sea salt
¼ teaspoon freshly ground black pepper
1 large egg, beaten [for brushing the tart shell]
preparing the tart dough:
1. Combine the millet flour, sweet rice flour, tapioca flour, xanthan gum and salt in a food processor.
2. Add in the cold butter bits and process until a coarse meal forms.
3. Add egg and egg yolk and run the food processor until dough forms.
4. Pour mixture onto a cold work surface and knead until smooth.
5. Form dough into a disc shape and chill until firm, approximately 2-4 hours.
pre-baking the tart shell:
1. Allow dough to soften so it can be rolled out easily, approximately 30 minutes.
2. On a floured piece of parchment roll a third of the dough into a seven inch circle.
3. Press into a six inch tart ring and set aside. Repeat with remaining two rinds & chill for 15 minutes.
4. Bake in a 375°F for 15 minutes.
5. Remove from the oven and brush with beaten egg. Bake for another 15 minutes.
6. Set aside while you prepare the filling.
*note: Tart rings have no bottoms so line a baking sheet with parchment and fill with dough right on the sheet.
preparing the filling:
1. Saute leeks in coconut oil for a minute over medium heat.
2. Add asparagus pieces and cook until tender. Cool slightly.
3. Whisk together eggs, cream, chives, salt and pepper.
4. Divide asparagus and leeks amongst the tart shells and pour custard over.
5. Bake until custard is just set in the center, approximately 15-20 minutes.
Fresh, light and flavorful…

My mind has been on fresh flavors lately, gearing up for spring in anticipation for the farmer’s markets to open with loads of fresh produce. I mainly go for the spring peas and ramps at this time, but getting out and enjoying the warmer sunshine is welcoming after a bleak winter.

The raw fennel and beet salad made several days ago was simple, but it was what we needed; a good boost of nutrition. No brisk walk later!
The Chioggia beets were not intentionally used in this salad, but somehow a few landed in the cart while picking the deep red variety. I didn’t even know they were there! I love the look of these beets when shaved very thin and leaving them uncooked; vibrant and sweet with a bit of earthiness. So here they are, in this salad.

Another salad was made a few days later, for a light dinner. The wonderful Vietnamese type salads you can make are great for a more substantial meal where lettuce wouldn’t be enough. Of course J. sighs when I make a dish that will need to be photographed before we can eat. Luckily this was a quick recipe, a few quick snaps and it was time to eat. J. loves these kinds of meals; the flavors are fresh, garlicky and spicy.
The special ingredient is the sauce for this shrimp noodle salad. You take equal parts lime juice and sugar, and then season with fish sauce, garlic and chilies to your liking.

I think fresh energizing flavors is what we all need, and a little bit of warm sunshine to shake off the winter blues…don’t you think?
Coconut Shrimp Noodle Salad [Serves 2]
10 whole shrimp, peeled & de-veined
½ cup shredded coconut
1 egg white
Sea salt to taste
8 ounces rice noodles [cooked per package instructions]
1 large purple carrot, julienne
1 small cucumber, thinly sliced
2 large radishes, julienne
2 handfuls mixed greens -or- chopped romaine
¼ cup fresh mint leaves
¼ cup Thai basil leaves
¼ cup fresh lime juice
¼ cup cane sugar
2 Tablespoons fish sauce
½ garlic clove, minced
½ teaspoon crushed chilies
Mung bean -or- other kind of sprouts [optional]
Preheat oven to 350°F.
1. Coat shrimp with beaten egg white and coat with coconut.
2. Place shrimp on a sheet pan lined with parchment paper coated with coconut spray.
3. Bake for 15-20 minutes or until shrimp is opaque and coconut starts to color.
4. While shrimp is cooking, combine lime juice, sugar, fish sauce, garlic and chilies in a small bowl.
5. Fill bowls with lettuce then rice noodles.
6. Place shrimp and prepared vegetables over noodles and pour sauce over and enjoy.
*note: A traditional Vietnamese salad uses pickled carrots and radishes which you can do in a snap with some rice vinegar and a little sugar to balance. Drain the vegetables after 30 minutes of marinating and continue with recipe.
Beet & Fennel Salad Recipe [Serves 2-4]
1 large fennel bulb, shaved -or- julienne
2 medium golden beets, shaved into rounds
2 medium Chioggia beets, shaved into thin rounds
1/3 cup fresh peas
4 Tablespoons grape seed oil -or- olive oil
2 Tablespoons fresh lemon juice
2 Tablespoons fresh lime zest
3 Tablespoons fresh orange juice
2 ½ teaspoons cane sugar -or- honey
1 Tablespoons shallots, minced
¼ teaspoon sea salt
1. Toss fennel, beets, peas and some of the feathery fennel tops together in a bowl.
2. Whisk together everything except the oil and marinate for 10 minutes.
3. Just before serving, which oil into the juice in a little stream until emulsified.
4. Toss with vinaigrette and enjoy.
With all of the varieties of plant specimens available you are sure to find something for every spot or style that fits your garden. Now finding the right plant can be a challenge. Most nurseries carry a variety of commonly known types and a few unique selections that entice gardeners to try. I find that if you scour the gardening catalogs you will find many unusual plants and ones that fit your needs.
Considering to start your plants and vegetables from seed may seem like a frustrating task or just feels like a big job you can do without. I have felt this way for many years back when I gave seed starting a try. Giving in to not so great results, I started reading and experimenting to see how this could work because I wanted to grow plants unavailable in the nurseries and stock up on plants that would be more costly if purchased.
Deciding to start perennials from seed is a great way to add volume to a garden, but in doing so; perennials can take a few years to mature. I choose to stick with annuals, vegetables and perennials that give the greatest impact sooner. Plants that require several years to start bearing flowers I go ahead and purchase them for some instant gratification.
Something I am always finding myself doing this time of years is deciding on how to go about starting seeds. Should I try something new? Perhaps over complicate something that is just seemingly simple. So this year I will be sticking to my favorite way to cultivate plants and forget about all those elaborate seed starting contraptions.
 1-seed Pots | 2- soilless seed starting mix | 3- pearlite | 4- seeds
5- starter fertilizer | 6- plant markers
The photo above illustrates all of the supplies I use to start seeds indoors, with the exception of heating mats and grow lamps.

Based on a last frost date of May 15th this is what my seed starting schedule looks like. Everything will be in order for the first seeds to be started. Typically a month is sufficient in my “greenhouse” to raise plants ready for the outdoors. Plants quickly outgrow the little space I have for them and out they go into the cold frame.
Don’t be discouraged that a detailed how-to list is not included in this post. Once seeds are ready for planting there will be a step by step guide in a separate post. If you are planning wonderful things this spring for your garden, get ready, planting soon will begin.
